AWS AMI Setup
This module is primarily for the course developers to document how the AWS AMI was developed for the course. Students will start from an AMI where some system setup will be done already, but students will still learn to install all necessary bioinformatics files.
Current published version of this course AMI
The AMI has already been built using the following intructions and is available as:
pmbio ami v4 (ami-05634ed111b3581c1) (Publicly available in London Zone or under My AMIs in the MGriffithLab account)
Initial AWS setup for development and testing purposes
For development purposes we started with a very large instance (overkill). Future experimentation is needed to determine the appropriate size for actual student instances. To setup an EC2 instance:
- Select Ubuntu Server 18.04 LTS (HVM), SSD Volume Type
- Choose r5.2xlarge (8 vCPUs, 64 GiB Memory, up to 10 Gigabit Network Performance)
- Increase root storage to 500GB
- Add storage: 2,000 GiB (~2TB) EBS volume, not encrypted
- Configure security: Allow SSH and HTTP access
- Download PEM file when prompted and set appropriate rights (e.g. chmod 400)
- Launch instance
- Login with key the usual way (e.g. ssh -i pmbio.pem ubuntu@18.217.114.211)
Note on creating DNS records for students to use
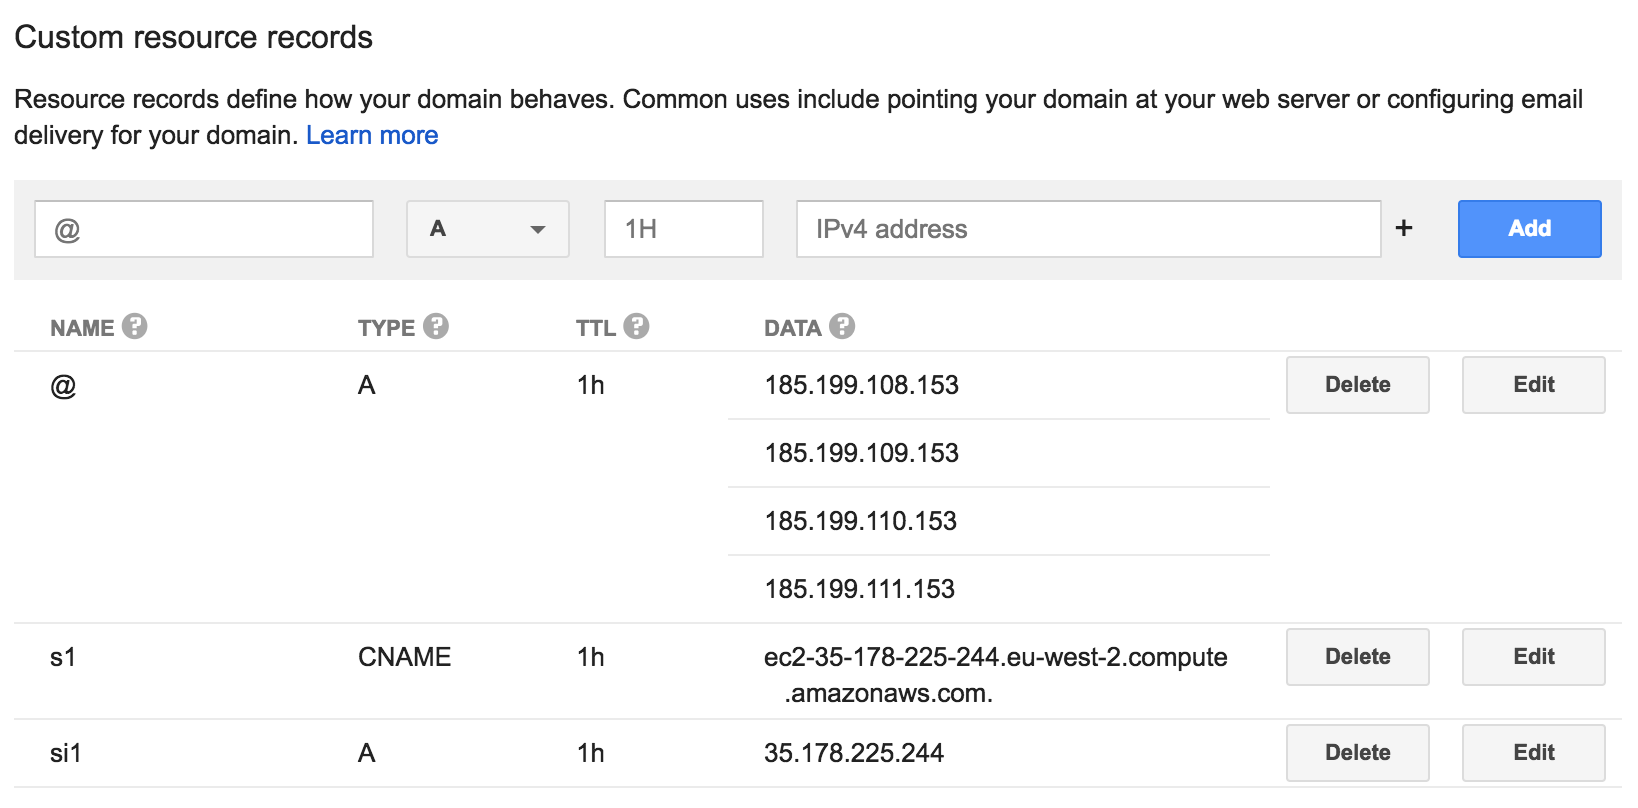
Instead of each student using their instances public IP address or public DNS, we can create pmbio.org sub-domains for them to use that point to the AWS instance (e.g. student1.pmbio.org). If we want to shut down instances during the course and spin them up later, since the IP address will change we could update the DNS record and the student could continue to use the same DNS name to log in. This can be done in the Google Domains dashboard for pmbio.org in two ways:
- NAME, TYPE, TTL, DATA
- student1, A, 1h, 18.220.123.159
- student1, CNAME, 1h, ec2-18-220-123-159.us-east-2.compute.amazonaws.com
Example configuration in Google Domains dashboard for pmbio.org
Before doing anything, do a basic upgrade of packages to ensure latest security patches are applied
# sudo apt-get update -y && sudo apt-get upgrade -y
# Note that this can lead to a grub update and possibly some confusion about the boot device. Avoid this for now...
# Have not found a good solution that avoids the grub config dialog window- JS 12/3/18
Formatting and mounting storage volumes
After initializing the EC2 instance we will need to mount and format the storage volume we allocated. Students will use this volume to install their own copies of tools used as well as input data and results. See http://docs.aws.amazon.com/AWSEC2/latest/UserGuide/ebs-using-volumes.html for guidance on setting up fstab records for AWS.
# start sudo shell
sudo bash

# get structure
lsblk

# make a workspace directory in root
cd /
mkdir workspace

# format the mount (WARNING- assumes empty volume. Will reformat any existing file structure or data.)
mkfs -t ext4 /dev/xvdb

# mount the drive with the allocated space
mount /dev/xvdb /workspace
chown -R ubuntu:ubuntu /workspace

# make storage mounts persistent
sudo file -s /dev/xvdb
sudo file -s /dev/xvdb | perl -ne 'chomp; if ($_ =~ /UUID\=(\S+)/){print "\nUUID=$1 /workspace ext4 defaults,nofail 0 2\n"}'

# add the resulting line to mounting configuration file, fstab. Include the UUID you identified above (looks like: 6f18f18a-b1d7-4c7a-8a2a-05bb3ca97a3a)
#sudo vim /etc/fstab
#UUID=UUID-goes-here       /data   ext4    defaults,nofail        0       2

# make symlink for convenience
cd ~
ln -s /workspace workspace

# exit sudo shell
exit
Installation of Software Tools and Their Dependencies
The software tools used in this course have underlying dependencies. Many of these are not included in the basic Ubuntu distribution, and we will have to install them. Ubuntu is based on the Debian operating system, and we can use the Debian based package manager apt-get for installation. Below, installation of bioinformatics tools and their stand-alone dependencies is described. Note that because each tool installation is described independently, there is some redundancy in commands for dependency installation.
Pre-Installation
Describes the general system wide dependencies required for downloading and decompressing source and binary files related to the tools to be installed. A few general use tools are also listed.
# start sudo shell
sudo bash

# general tools for installation and use
cd /usr/local/bin
apt-get update -y && apt-get install -y wget bzip2 unzip git curl tree docker docker.io && apt-get build-dep imagemagick checkinstall inkscape librsvg2-2

# allow the ubuntu user to use docker
usermod -a -G docker ubuntu

# install miniconda dependency
cd /usr/local/bin
wget https://repo.continuum.io/miniconda/Miniconda3-latest-Linux-x86_64.sh
bash Miniconda3-latest-Linux-x86_64.sh # accept license, choose /usr/local/bin/miniconda as install location, and yes add conda to path when asked
source ~/.bashrc

# the conda install messes up byobu which expects system python to be first in the path. Fix this by adding the following to ~/.bashrc
#BYOBU_PYTHON=/usr/bin/python3

# the imagemagick page has a bug in its convert functionality that requires an edit to its config
# edit the PDF section in the config file, /etc/ImageMagick-6/policy.xml, and change the PDF rights from
<policy domain="coder" rights="none" pattern="PDF" />
to
<policy domain="coder" rights="read|write" pattern="PDF" />


# exit sudo shell
exit
R 3.5.1
Describes dependencies and installation for R 3.5.1, used in this course for general file manipulation/analysis.
# start sudo shell
sudo bash

# Install R Dependencies
cd /usr/local/bin
apt-get update -y && apt-get install -y \
  gfortran \
  libreadline-dev \
  libpcre3-dev \
  libcurl4-openssl-dev \
  build-essential \
  zlib1g-dev \
  libbz2-dev \
  liblzma-dev \
  openjdk-8-jdk

# install R
wget https://cran.r-project.org/src/base/R-3/R-3.5.1.tar.gz
tar -zxvf R-3.5.1.tar.gz
cd R-3.5.1
./configure --prefix=/usr/local/ --with-x=no –-enable-R-shlib
make
make install

# test R installation
/usr/local/bin/Rscript

# install devtools and BiocManager dependencies
apt-get update -y && apt-get install -y \
  libssl-dev \
  libxml2-dev

# install devtools and BiocManager
R --vanilla -e 'install.packages(c("devtools", "BiocManager"), repos="http://cran.us.r-project.org")'

# change write permissions so students can install additional packages
chown -R ubuntu:ubuntu /usr/local/lib/R/library
find /usr/local/lib/R/library -type d -exec chmod 777 {} \;
find /usr/local/lib/R/library -type f -exec chmod 664 {} \;
find /usr/local/lib/R/doc/ -type d -exec chmod 777 {} \;
find /usr/local/lib/R/doc/ -type f -exec chmod 664 {} \;

# exit sudo shell
exit
Samtools 1.7
Describes dependencies and installation for samtools 1.7, used in this course for general bam file manipulation.
# start sudo shell
sudo bash

# samtools dependencies
cd /usr/local/bin
apt-get update -y && apt-get install -y \
  build-essential \
  libncurses5-dev \
  zlib1g-dev \
  libbz2-dev \
  liblzma-dev

# samtools installation
wget https://github.com/samtools/samtools/releases/download/1.7/samtools-1.7.tar.bz2
tar --bzip2 -xvf samtools-1.7.tar.bz2
cd samtools-1.7
./configure --prefix=/usr/local/bin/samtools-1.7/
make
make install

#create symlink
ln -s /usr/local/bin/samtools-1.7/bin/samtools /usr/local/bin/samtools

# test samtools installation
/usr/local/bin/samtools

# exit sudo shell
exit
PICARD 2.18.14
Describes dependencies and installation for PICARD 2.18.14, used in this course for general bam file manipulation and QC.
# start sudo shell
sudo bash

# picard dependencies
cd /usr/local/bin
apt-get update -y && apt-get install -y \
  openjdk-8-jdk

# picard installation
wget https://github.com/broadinstitute/picard/releases/download/2.18.14/picard.jar
export PICARD='/usr/local/bin/picard.jar'

# test picard installation
java -jar /usr/local/bin/picard.jar

# exit sudo shell
exit
BWA 0.7.17
Describes dependencies and installation for BWA 0.7.17, used in this course for DNA alignment.
# start sudo shell
sudo bash

# bwa dependencies
cd /usr/local/bin
apt-get update -y && apt-get install -y \
  build-essential \
  libz-dev

# bwa installation
wget https://cytranet.dl.sourceforge.net/project/bio-bwa/bwa-0.7.17.tar.bz2
tar --bzip2 -xvf bwa-0.7.17.tar.bz2
cd  bwa-0.7.17
make
ln -s /usr/local/bin/bwa-0.7.17/bwa /usr/local/bin/bwa

# test bwa installation
/usr/local/bin/bwa

# exit sudo shell
exit
GATK 4.0.2.1
Describes dependencies and installation for GATK 4.0.2.1, used in this course for variant discovery.
# start sudo shell
sudo bash

# install additional dependencies
cd /usr/local/bin
apt-get update -y && apt-get install -y \
  openjdk-8-jdk

# install R dependencies
R --vanilla -e 'install.packages(c("gsalib", "ggplot2","reshape", "gplots"), repos="http://cran.us.r-project.org")'

# install GATK environment
wget https://github.com/broadinstitute/gatk/releases/download/4.0.10.1/gatk-4.0.10.1.zip
unzip gatk-4.0.10.1.zip
cd /usr/local/bin/gatk-4.0.10.1
conda env create -n gatk -f gatkcondaenv.yml
# to use gatk: source activate gatk
# note that we told the installer to add conda to the paths
# added by Miniconda3 installer
# export PATH="/usr/local/bin/miniconda/bin:$PATH"

# symlink gatk executable
ln -s /usr/local/bin/gatk-4.0.10.1/gatk /usr/local/bin/gatk

# test gatk installation
/usr/local/bin/gatk

# exit sudo shell
exit
VEP 93.4
Describes dependencies for VEP 93.4, used in this course for variant annotation. When running the VEP installer follow the prompts specified:
- Do you want to install any cache files (y/n)? y [ENTER] (select number for homo_sapiens_vep_93_GRCh38.tar.gz) [ENTER]
- Do you want to install any FASTA files (y/n)? y [ENTER] (select number for homo_sapiens) [ENTER]
- Do you want to install any plugins (y/n)? n [ENTER]
-
Note: VEP natively supports gnomad allele frequencies but it is unclear if this works for all variants or only for dbSNP subset of variants. See: http://useast.ensembl.org/info/docs/tools/vep/script/vep_other.html#assembly
-
To access the full gnomAD data set, it is possible to use VEP’s custom annotation feature to retrieve the frequency data directly from the gnomAD VCF files. See: http://useast.ensembl.org/info/docs/tools/vep/script/vep_example.html#gnomad
# start sudo shell
sudo bash

# Install VEP dependencies
cd /usr/local/bin
apt-get update -y && apt-get install -y \
  libdbi-perl \
  libdbd-mysql-perl \
  build-essential \
  zlib1g-dev \
  libmodule-build-perl \
  cpanminus

# install vep with the various plugins
cd /usr/local/bin
mkdir -p /opt/vep_cache
wget https://github.com/Ensembl/ensembl-vep/archive/release/94.zip
unzip 94.zip
cd ensembl-vep-release-94/
perl INSTALL.pl --CACHEDIR /opt/vep_cache
# NOTE at this step, follow instructions above for install prompts

# make symlinks to vep and filter_vep in /usr/local/bin/
ln -s /usr/local/bin/ensembl-vep-release-94/vep /usr/local/bin/vep
ln -s /usr/local/bin/ensembl-vep-release-94/filter_vep /usr/local/bin/filter_vep

# Install required data for plugins
mkdir -p /opt/vep_cache/data
cd /opt/vep_cache/data
wget -c ftp://ftp.ensembl.org/pub/data_files/homo_sapiens/GRCh38/variation_genotype/gnomad.exomes.r2.0.1.sites.GRCh38.noVEP.vcf.gz
wget -c ftp://ftp.ensembl.org/pub/data_files/homo_sapiens/GRCh38/variation_genotype/gnomad.exomes.r2.0.1.sites.GRCh38.noVEP.vcf.gz.tbi

# Install the WildType plugin
mkdir -p /opt/vep_cache/Plugins
cd /opt/vep_cache/Plugins
wget Wildtype.pm https://raw.githubusercontent.com/griffithlab/pVAC-Seq/master/pvacseq/VEP_plugins/Wildtype.pm --no-check-certificate

# unlock permissions for downloaded cache
find /opt/vep_cache -type d -exec chmod 777 {} \;
find /opt/vep_cache -type f -exec chmod 664 {} \;

# test vep installation
/usr/local/bin/vep

# exit sudo shell
exit
VarScan 2.4.2
Describes dependencies and installation for VarScan 2.4.2, used in this course for variant calling
# start sudo shell
sudo bash

# varscan dependencies
cd /usr/local/bin
apt-get update -y && apt-get install -y \
  openjdk-8-jdk

# install varscan
curl -L -k -o VarScan.v2.4.2.jar https://github.com/dkoboldt/varscan/releases/download/2.4.2/VarScan.v2.4.2.jar

# test varscan installation
java -jar /usr/local/bin/VarScan.v2.4.2.jar

# exit sudo shell
exit
BCFtools 1.3.1
Describes dependencies and installation for BCFtools 1.3.1, used in this course for manipulating VCF files.
# start sudo shell
sudo bash

# BCFtools dependencies
cd /usr/local/bin
apt-get update -y && apt-get install -y \
  build-essential \
  libz-dev

# install BCFtools
curl -L -k -o bcftools-1.3.1.tar.bz2 https://github.com/samtools/bcftools/releases/download/1.3.1/bcftools-1.3.1.tar.bz2
tar --bzip2 -xvf bcftools-1.3.1.tar.bz2
cd bcftools-1.3.1
make -j
make prefix=/usr/local/bin/bcftools-1.3.1 install

# make symlink
ln -s /usr/local/bin/bcftools-1.3.1/bin/bcftools /usr/local/bin/bcftools

# test bcftools installation
/usr/local/bin/bcftools

# exit sudo shell
exit
Strelka 2.7.1
Describes dependencies and installation for strelka, used in this course for variant calling. Note that Strelka requies python 2.
# start sudo shell
sudo bash

# strelka dependencies
cd /usr/local/bin
apt-get update -y && apt-get install -y \
  python-dev

# install strelka
curl -L -k -o strelka-2.7.1.centos5_x86_64.tar.bz2 https://github.com/Illumina/strelka/releases/download/v2.7.1/strelka-2.7.1.centos5_x86_64.tar.bz2
tar --bzip2 -xvf strelka-2.7.1.centos5_x86_64.tar.bz2 # note uses python2

# test strelka installation
python2 /usr/local/bin/strelka-2.7.1.centos5_x86_64/bin/configureStrelkaWorkflow.py -h

# run strelka test analysis
conda create -y --name strelka python=2.7
source activate strelka
/usr/local/bin/strelka-2.7.1.centos5_x86_64/bin/runStrelkaWorkflowDemo.bash
source deactivate

# exit sudo shell
exit
Sambamba 0.6.4
Describes dependencies and installation for Sambamba 0.6.4, used in this course for ….
# start sudo shell
sudo bash

# install sambamba
cd /usr/local/bin
curl -L -k -o sambamba_v0.6.4_linux.tar.bz2 https://github.com/lomereiter/sambamba/releases/download/v0.6.4/sambamba_v0.6.4_linux.tar.bz2
tar --bzip2 -xvf sambamba_v0.6.4_linux.tar.bz2
ln -s /usr/local/bin/sambamba_v0.6.4 /usr/local/bin/sambamba

# test sambamba installation
/usr/local/bin/sambamba

# exit sudo shell
exit
HISAT 2.0.4
Describes dependencies and installation for HISAT 2.0.4, used in this course for RNA alignment.
# start sudo shell
sudo bash

# install hisat2
cd /usr/local/bin
wget ftp://ftp.ccb.jhu.edu/pub/infphilo/hisat2/downloads/hisat2-2.0.4-Linux_x86_64.zip
unzip hisat2-2.0.4-Linux_x86_64.zip
ln -s /usr/local/bin/hisat2-2.0.4/hisat2 /usr/local/bin/hisat2

# test hisat installation
/usr/local/bin/hisat2 -h

# exit sudo shell
exit
StringTie 1.3.0
Describes dependencies and installation for StringTie 1.3.0, used in this course for transcript abundance estimates.
# start sudo shell
sudo bash

# install stringtie
cd /usr/local/bin
wget http://ccb.jhu.edu/software/stringtie/dl/stringtie-1.3.0.Linux_x86_64.tar.gz
tar -xzvf stringtie-1.3.0.Linux_x86_64.tar.gz
ln -s /usr/local/bin/stringtie-1.3.0.Linux_x86_64/stringtie /usr/local/bin/stringtie

# test stringtie installation
/usr/local/bin/stringtie -h

# exit sudo shell
exit
Gffcompare 0.9.8
Describes dependencies and installation for Gffcompare 0.9.8, used in this course to compare assembled/predicted RNA transcripts to known transcript annotations.
# start sudo shell
sudo bash

# intall Gff compare
cd /usr/local/bin
wget http://ccb.jhu.edu/software/stringtie/dl/gffcompare-0.9.8.Linux_x86_64.tar.gz
tar -xzvf gffcompare-0.9.8.Linux_x86_64.tar.gz
ln -s /usr/local/bin/gffcompare-0.9.8.Linux_x86_64/gffcompare /usr/local/bin/gffcompare

# test gffcompare installation
/usr/local/bin/gffcompare

# exit sudo shell
exit
copyCat 1.6.12
Describes dependencies and installation for copyCat 1.6.12, used in this course for WGS copy number calling.
# start sudo shell
sudo bash

# Install copyCat dependencies (see R section for installing R)
cd /usr/local/bin
R --vanilla -e 'BiocManager::install(c("IRanges", "DNAcopy"))'

# Install copyCat
R --vanilla -e 'devtools::install_github("chrisamiller/copycat")'

# exit sudo shell
exit
CNVnator
Describes dependencies and installation for CNVnator, used in this course for exome copy number calling.
# start sudo shell
sudo bash

# install CNVnator dependency root
cd /usr/local/bin
apt-get update -y && apt-get install -y \
  build-essential \
  libncurses5-dev \
  zlib1g-dev \
  libbz2-dev \
  liblzma-dev \
  libxpm4
wget https://root.cern.ch/download/root_v6.14.04.Linux-ubuntu16-x86_64-gcc5.4.tar.gz
tar -xzvf root_v6.14.04.Linux-ubuntu16-x86_64-gcc5.4.tar.gz

# set required variables
export ROOTSYS=/usr/local/bin/root
export PATH=$ROOTSYS/bin:$PATH
export LD_LIBRARY_PATH=$ROOTSYS/lib:$LD_LIBRARY_PATH

# install CNVnator dependency yeppp
wget http://bitbucket.org/MDukhan/yeppp/downloads/yeppp-1.0.0.tar.bz2
tar -xvjf yeppp-1.0.0.tar.bz2
export YEPPPLIBDIR=/usr/local/bin/yeppp-1.0.0/binaries/linux/x86_64
export YEPPPINCLUDEDIR=/usr/local/bin/yeppp-1.0.0/library/headers
export LD_LIBRARY_PATH=$YEPPPLIBDIR:$LD_LIBRARY_PATH

# install CNVnator
wget https://github.com/abyzovlab/CNVnator/releases/download/v0.3.3/CNVnator_v0.3.3.zip
unzip CNVnator_v0.3.3.zip
cd CNVnator_v0.3.3/src/samtools
make
cd ../
make

# make sylink
ln -s /usr/local/bin/CNVnator_v0.3.3/src/cnvnator /usr/local/bin/cnvnator

# test cnvnator installation
/usr/local/bin/cnvnator

# exit sudo shell
exit
cnvkit
Describes dependencies and installation for cnvkit, used in this course for calling copy number variants from hybrid capture data such as exomes.
# start sudo shell
sudo bash

# install cnvkit
cd /usr/local/bin
conda config --add channels defaults
conda config --add channels conda-forge
conda config --add channels bioconda
conda create -y -n cnvkit cnvkit
# source activate cnvkit to use

# test cnvkit installation
source activate cnvkit
cnvkit.py -h
source deactivate

# exit sudo shell
exit
Kallisto 0.44.0
Describes dependencies and installation of Kallisto 0.44.0, used in this course for abundance estimation.
# start sudo shell
sudo bash

# install kallisto
cd /usr/local/bin
wget https://github.com/pachterlab/kallisto/releases/download/v0.44.0/kallisto_linux-v0.44.0.tar.gz
tar -zxvf kallisto_linux-v0.44.0.tar.gz
ln -s /usr/local/bin/kallisto_linux-v0.44.0/kallisto /usr/local/bin/kallisto

# test kallisto installation
/usr/local/bin/kallisto

# exit sudo shell
exit
Pizzly 0.37.3
Describes dependencies and installation of Pizzly, used in this course for fusion detection.
# start sudo shell
sudo bash

# install Pizzly
cd /usr/local/bin
mkdir pizzly-v0.37.3
cd pizzly-v0.37.3
wget https://github.com/pmelsted/pizzly/releases/download/v0.37.3/pizzly_linux.tar.gz
tar -zxvf pizzly_linux.tar.gz
ln -s /usr/local/bin/pizzly-v0.37.3/pizzly /usr/local/bin/pizzly

# test pizzly installation
/usr/local/bin/pizzly --help

# exit sudo shell
exit
Manta 1.4.0
Describes dependencies and installation of Manta, used in this course for SV datection.
# start sudo shell
sudo bash

# download and extract
cd /usr/local/bin
wget https://github.com/Illumina/manta/releases/download/v1.4.0/manta-1.4.0.centos6_x86_64.tar.bz2
tar --bzip2 -xvf manta-1.4.0.centos6_x86_64.tar.bz2

# test installation
python2 /usr/local/bin/manta-1.4.0.centos6_x86_64/bin/configManta.py --help

# run strelka test analysis
conda create -y --name manta python=2.7
source activate manta
/usr/local/bin/manta-1.4.0.centos6_x86_64/bin/runMantaWorkflowDemo.py
source deactivate

ln -s /usr/local/bin/manta-1.4.0.centos6_x86_64/bin/configManta.py /usr/local/bin/configManta.py

# exit sudo shell
exit
mosdepth 0.2.3
Describes dependencies and installation of mosdepth, used in this course for depth caluclations.
# start sudo shell
sudo bash

# install mosdepth
cd /usr/local/bin
conda install -y mosdepth

# test mosdepth installation
/usr/local/bin/miniconda/bin/mosdepth -h

# exit sudo shell
exit
bam-readcount
Describes dependencies and installation of bam-readcount, used in this course for variant counting, VAFs, etc.
# start sudo shell
sudo bash

# install cmake dependency
apt-get update -y && apt-get install -y cmake

# install bam-readcount
cd /usr/local/bin
git clone https://github.com/genome/bam-readcount.git
mv bam-readcount bam-readcount-latest
cd bam-readcount-latest
cmake -Wno-dev /usr/local/bin/bam-readcount-latest
make
ln -s /usr/local/bin/bam-readcount-latest/bin/bam-readcount /usr/local/bin/bam-readcount

# test bam-readcount installation
/usr/local/bin/bam-readcount

# exit sudo shell
exit
bam-readcount helper script
A python script used to run bam-readcount on a VCF file
# start sudo shell
sudo bash

# install the script and needed conda environment
cd /usr/local/bin
wget https://raw.githubusercontent.com/griffithlab/pmbio.org/master/assets/scripts/bam_readcount_helper.py
chmod +x bam_readcount_helper.py

conda create -y --name bam-readcount python=3.6
conda install -y --name bam-readcount cyvcf2

# test installation
# when needing to use this script, activate environment as following:
source activate bam-readcount
/usr/local/bin/bam_readcount_helper.py

# when done
source deactivate

#exit sudo shell
exit
vt
vt is a variant tool set that discovers short variants from Next Generation Sequencing data. We will use this for the purpose of splitting multi-allelic variants.
# start sudo shell
sudo bash

# install vt
cd /usr/local/bin
git clone https://github.com/atks/vt.git
mv vt vt-latest
cd vt-latest
make
make test

#create symlink
ln -s /usr/local/bin/vt-latest/vt /usr/local/bin/vt

# test installation
/usr/local/bin/vt

# exit sudo shell
exit
vcf-annotation-tools
VCF Annotation Tools is a python package that includes several tools to annotate VCF files with data from other tools. We will be using this for the purpose of adding bam readcounts to the vcf files.
# start sudo shell
sudo bash

# install vcf-annotation-tools
pip install vcf-annotation-tools

# test installation
vcf-readcount-annotator -h

# exit sudo shell
exit
fastqc
FastQC is a quality control tool for high throughput sequence data used in the course to produce visual QC reports for FastQ and BAM files.
# start sudo shell
sudo bash

# install fastqc
cd /usr/local/bin
wget https://www.bioinformatics.babraham.ac.uk/projects/fastqc/fastqc_v0.11.8.zip
unzip fastqc_v0.11.8.zip
chmod 755 FastQC/fastqc

# create a symlink
ln -s /usr/local/bin/FastQC/fastqc /usr/local/bin/fastqc

# test the installation
/usr/local/bin/fastqc --help

# exit sudo shell
exit
MultiQC
MultiQC is a quality control tool that searches a given directory for analysis logs and compiles a HTML report. We use it in the course to compile and organize QC results from other tools into a single report.
# start sudo shell
sudo bash

# install multiqc
cd /usr/local/bin
pip install multiqc

# test the installation
multiqc -h

# exit sudo shell
exit
Optitype
Describes dependencies and installation of optitype, used in this course for HLA typing
# due to the complexity of optitype dependencies we will use a docker image for optitype
# pull docker image as ubuntu user
docker pull fred2/optitype

# test the optitype image
docker run -t fred2/optitype
pvactools
Installation of pvactools, used in this course for neantigen characterization
#To avoid having to install IEDB we will use a docker image for pvactools
#pull docker image as ubuntu user
docker pull griffithlab/pvactools:1.1.1

# test the pvactools image
docker run -t griffithlab/pvactools:1.1.1 pvacseq --help
GenVisR
Installation of GenVisR, used in this course to created advanced publication quality genomic data visualizations.
# start sudo shell
sudo bash

# install GenVisR
R --vanilla -e 'BiocManager::install(c("GenVisR"))'

#exit sudo shell
exit
flexbar
Installation of flexbar, used in this course for read trimming exercises of various kinds.
# start sudo shell
sudo bash

# install flexbar
cd /usr/local/bin
wget https://github.com/seqan/flexbar/releases/download/v3.4.0/flexbar-3.4.0-linux.tar.gz
tar -zxvf flexbar-3.4.0-linux.tar.gz
cd flexbar-3.4.0-linux

# create symlink
ln -s /usr/local/bin/flexbar-3.4.0-linux/flexbar /usr/local/bin/flexbar

# test installation
/usr/local/bin/flexbar --help

# exit sudo shell
exit
regtools
Installation of regtools, used in this course for splice junction and regulatory variant analysis
# start sudo shell
sudo bash

# install regtools
cd /usr/local/bin
git clone https://github.com/griffithlab/regtools
mv regtools regtools-latest
cd regtools-latest/
mkdir build
cd build/
cmake ..
make

# create symlink
ln -s /usr/local/bin/regtools-latest/build/regtools /usr/local/bin/regtools

# test installation
/usr/local/bin/regtools

# exit sudo shell
exit
liftOver
Installation of the liftover tool, used in this course to convert coordinates from one genome build to another.
# start sudo shell
sudo bash

# add remotes and install liftover
conda config --add channels bioconda
conda install -y ucsc-liftover

# test installation
liftOver

# exit sudo shell
exit
Sleuth
Installation of the sleuth tool, used in this course for differential expression analysis starting from kallisto abundance estimates.
# start sudo shell
sudo bash

# install sleuth
R --vanilla -e 'BiocManager::install(c("rhdf5"))'
R --vanilla -e 'devtools::install_github("pachterlab/sleuth")'

# exit sudo shell
exit
HTSeq
Installation of the HTSeq tool, used in this course to get raw read counts for RNA-seq data.
# start sudo shell
sudo bash

# install htseq using pip
pip install HTSeq

# test installation
htseq-count -h

#exit sudo shell
exit
bedtools
Installation of the bedtools suite, used in this course for various genome math
# start sudo shell
sudo bash

#install bedtools
cd /usr/local/bin
wget https://github.com/arq5x/bedtools2/releases/download/v2.27.1/bedtools-2.27.1.tar.gz
tar -zxvf bedtools-2.27.1.tar.gz
cd bedtools2
make

# create symlink
ln -s /usr/local/bin/bedtools2/bin/bedtools /usr/local/bin/bedtools

#test installation
/usr/local/bin/bedtools

#exit sudo shell
exit
gsutil
A google utility used to download annotation files stored in the Google cloud
cd /usr/local/bin

# Create an environment variable for the correct distribution:
export CLOUD_SDK_REPO="cloud-sdk-$(lsb_release -c -s)"

# Add the Cloud SDK distribution URI as a package source
echo "deb http://packages.cloud.google.com/apt $CLOUD_SDK_REPO main" | sudo tee -a /etc/apt/sources.list.d/google-cloud-sdk.list

# Import the Google Cloud public key
curl https://packages.cloud.google.com/apt/doc/apt-key.gpg | sudo apt-key add -

# Update and install the Cloud SDK
sudo apt-get update && sudo apt-get install -y google-cloud-sdk
cd /home/ubuntu
sudo chown -R ubuntu:ubuntu .config

# test installation
gsutil
tophat
Installation of the tophat suite. Note, this tool is currently only installed for the gtf_to_fasta tool to get a custom transcriptome fasta for use with kallisto.
# start sudo shell
sudo bash

# install tophat
cd /usr/local/bin
wget https://ccb.jhu.edu/software/tophat/downloads/tophat-2.1.1.Linux_x86_64.tar.gz
tar -zxvf tophat-2.1.1.Linux_x86_64.tar.gz
ln -s /usr/local/bin/tophat-2.1.1.Linux_x86_64/gtf_to_fasta /usr/local/bin/gtf_to_fasta

# test gtf_to_fasta tool
/usr/local/bin/gtf_to_fasta

#exit sudo shell
exit
svviz
Installation of svviz, used in the course to visualize structural variation
# start sudo shell
sudo bash

# install the tool
pip install -U svviz

# test installation
svviz

# exit sudo shell
exit
svviz2
Installation of svviz2, used in the course to visualize structural variation
# start sudo shell
sudo bash

#install the tool
pip install rpy2
pip install -U git+git://github.com/nspies/svviz2.git
pip install -U git+https://github.com/nspies/genomeview.git

# test installation
svviz2

#exit sudo shell
exit
Install any custom scripts we need
We try to avoid it as much as possible but in some cases we need custom scripts to accomplish certain tasks. In those cases we make these scripts available in the course github site and intall them in /usr/local/bin.
# start sudo shell
sudo bash

# install custom script to fix the chromosomes names in a GTF to be compatible with 1000g genome (or other genome that uses 'chr', non-ensembl names))
cd /usr/local/bin
wget https://raw.githubusercontent.com/griffithlab/pmbio.org/master/assets/course_scripts/convertEnsemblGTF.pl
chmod +x /usr/local/bin/convertEnsemblGTF.pl

# test installation
/usr/local/bin/convertEnsemblGTF.pl

# exit sudo shell
exit
some extra R packages that we might need
There are a few more R packages that don’t happen to be captured by the tools dependencies above that we might need
# start sudo shell
sudo bash

# install some R packages
R --vanilla -e 'install.packages(c("tidyverse"), repos="http://cran.us.r-project.org")'

# install some Bio Conductor packages
R --vanilla -e 'BiocManager::install(c("genefilter", "ballgown", "edgeR", "GenomicRanges", "rhdf5", "biomaRt", "DESeq2", "gage"))'

# exit sudo shell
exit
extra utilities
Describes installation of extra software helpfull to instructors but not necessarily used by Students
# start sudo shell
sudo bash

# install faSplit
conda install -y ucsc-fasplit

# exit sudo shell
exit
apache web serve setup
Set up apache web server for convenient access to files. This will allow students to easily download generated data from the /workspace directory. This directory is served from the IPv4 Public IP, which will be different for each user. This IP address can be viewed from the AWS EC2 instance site.
# start sudo shell
sudo bash

# install apache
apt-get update -y && apt-get install -y \
  apache2

# add the following to the config
#<Directory /workspace/>
#       Options Indexes FollowSymLinks
#       AllowOverride None
#       Require all granted
#</Directory>
sed -ie '/#<\/Directory>/a <Directory /workspace/>\n        Options Indexes FollowSymLinks\n        AllowOverride None\n        Require all granted\n</Directory>' /etc/apache2/apache2.conf

# change the document root in vhost file (000-default.conf)
sed -i 's/DocumentRoot \/var\/www\/html/DocumentRoot \/workspace/' /etc/apache2/sites-available/000-default.conf

# restart apache
service apache2 restart

# exit sudo shell
exit
Environment Variables
We need to set some environment variables so that they are available to the studens when they start up the instance. Importantly we se variables for CNVnator dependencies so students can install the software more easily. these are all added to the ‘~/.bashrc’ file.
# variables for ROOT
export ROOTSYS=/usr/local/bin/root
export PATH=$ROOTSYS/bin:$PATH
export LD_LIBRARY_PATH=$ROOTSYS/lib:$LD_LIBRARY_PATH

# variables for YEPP
export YEPPPLIBDIR=/usr/local/bin/yeppp-1.0.0/binaries/linux/x86_64
export YEPPPINCLUDEDIR=/usr/local/bin/yeppp-1.0.0/library/headers
export LD_LIBRARY_PATH=$YEPPPLIBDIR:$LD_LIBRARY_PATH
Final Cleanup
To finish up clean out the downloaded compressed binary files
# start sudo shell
sudo bash

# clean things out
cd /usr/local/bin
rm -f *.tar.gz
rm -f *.zip
rm -f *.bz2

# exit sudo shell
exit
TO ADD
- bedops is used for converting gtf to bed file as input to picard collectRNAmetrics command
- install R package for plotting: sudo R install.package(“hexbin”) 67
- add filter vep path to PATH